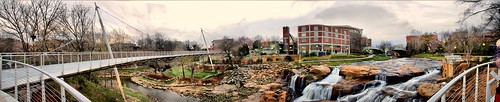
The photo above is a panorama of the Liberty Bridge, Falls Park, and Reedy Falls area in downtown Greenville. It consists of five images taken at a wide angle 18mm focal length, then stitched together in Photoshop. It turned out to be quite a learning process and experiment in adaptation.
The first thing I tried was to load up all five shots and try to use the automatic panorama tool in Photoshop. Some of the buildings were completely obliterated, and it simply rejected one image that it couldn’t get to fit. I’m still using version CS2 of Photoshop, so there may have been improvements in the automated tool, but the results with my version were disappointing. It was time to go to manual mode.
The problem with using wide-angle shots is that you get some unusual perspective distortion at the edges. If you look at each photo individually, each looks OK.


However, when you combine the images the edges just don’t match up. You can really see this in the line of the building in images three and four above. In image three, the top line of the building is tilting downward, and in image four it’s going the opposite direction.
I pasted each image into a master image. I used the Transform-Distort tool to get the edges to match as closely as possible as I added each layer. However that only got me part of the way there. There were still some hard lines where the layers came together. To fix this I created an image mask for each layer, then used a very soft brush to blend the transistions as best I could. I couldn’t make the image exactly accurate, but I could at least make the transitions less obvious.
Once I was happy with the transitions between the images, I had to work on the exposure blending. I first flattened the image, then made a duplicate of the flattened layer. The top layer was processed as psuedo-HDR using the ReDynamix plugin. I wasn’t happy with the way the sky looked like, so I used one more image mask on the upper layer to let the sky from the lower layer come through.
Then I made a discovery. I had done all this work on my desktop computer. When I looked at the image online there were problems with the sky, and the image didn’t look as vivid as I remembered. It turns out that I had the contrast settings on my desktop monitor set too low, and I wasn’t able to see all of the details I needed. I made have to use this as an excuse to get me a new monitor.
New monitor or no, I learned quite a bit from going through this process. I think the distortion could have been minimized by using more original images and greated overlap. Regardless, it was fun.
Hey Tom, most Canon cameras have a Photo stitch setting that helps with this kind of thing. In that mode you can take your first shot, then when you take the second, you can see part of that shot on the flip screen so you can line up the second with the first. Looks like you were shooting with the Nikon D50. I’m not sure if Nikons have this function but it’d be worth checking out. It’d save you a lot of time.
Great photo though. It was worth your effort.
Eric – My D50 doesn’t have the panorama assist, but my little Nikon S50 does, as does the S1 I had before that. The overlay suffers from the same problem – at wide angle there is perspective distortion at the edges. At least on the Nikons, the panorama assist mode only helps you line up the shots, but doesn’t really fix the overlap problems.
I had this problem the once or twice I have tried. You went through a lot more work than I did to fix it. (I never fixed it).
My solution was what you suggested…overlap more.
Your result is an outstanding shot, by the way.